Effective Methods for Repairing Gelcoat on the Bottom of Your Boat
Repairing the gelcoat on the bottom of your boat is essential for maintaining its appearance and performance. Over time, exposure to water, UV rays, and marine growth can lead to scratches, chips, and fading. Fortunately, you can restore your boat’s gelcoat with a few effective methods. Here are the steps to follow:
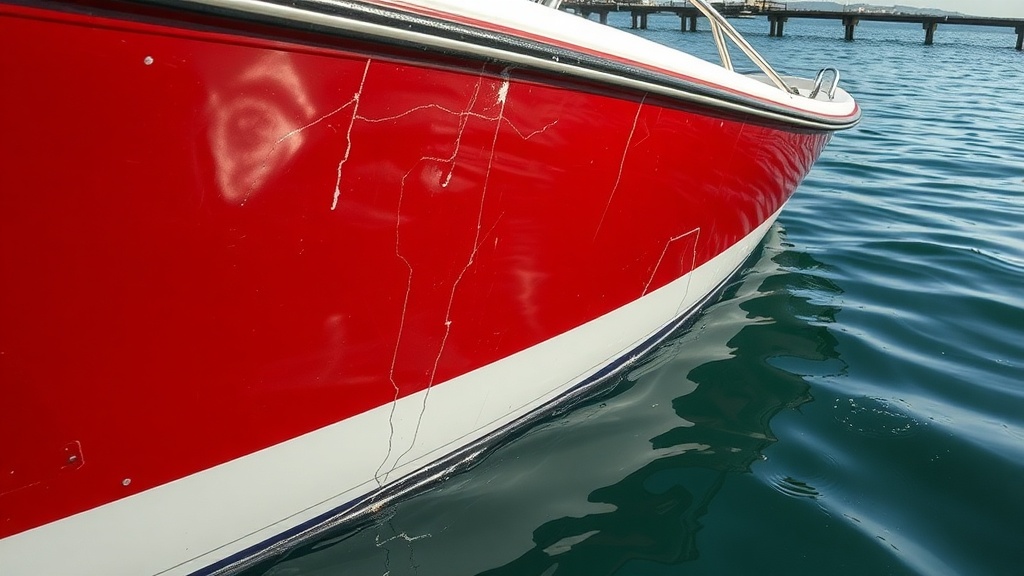
Assess the Damage
Begin by thoroughly inspecting the bottom of your boat. Look for any visible cracks, chips, or discoloration. It’s crucial to evaluate the extent of the damage before proceeding with repair. Minor scratches may only require a polish, while more significant damage will need filling and refinishing.
Gather Your Supplies
To repair gelcoat effectively, you will need several tools and materials:
- Gelcoat repair kit (includes gelcoat, hardener, and applicator)
- Sandpaper (various grits)
- Acetone or denatured alcohol
- Masking tape
- Mixing stick and cup
- Paintbrush or foam applicator
- Polishing compound
- Buffer or polisher
Prepare the Area
Before starting repairs, ensure that the boat is clean and dry. Wash the bottom of the boat to remove any dirt or marine growth. After cleaning, wipe the area with acetone or denatured alcohol to eliminate any residue. This step is crucial to ensure proper adhesion of the gelcoat.
Sand the Damaged Area
Using the sandpaper, gently sand the damaged region. Begin with coarse grit (around 80-120 grit), then progress to finer grit (up to 400 grit) for a smooth finish. Sand until the edges of the damage are feathered and the surface is scuffed, helping the gelcoat penetrate better.
Mask the Surrounding Area
After sanding, use masking tape to cover the area surrounding the damage. This protects the unaffected gelcoat from drips and provides clean lines for the repair. Ensure the tape is applied firmly to prevent any gelcoat from leaking beneath it.
Mix the Gelcoat
Following the instructions included in your gelcoat repair kit, mix the gelcoat with the hardener in a clean mixing cup. Stir it thoroughly using a mixing stick until you achieve an even consistency. Be mindful of the working time, as the gelcoat will start to harden after a certain period.
Apply the Gelcoat
Using a paintbrush or foam applicator, apply the mixed gelcoat to the damaged area. Fill in the scratch or chip completely, ensuring the surface is level with the surrounding gelcoat. Avoid overfilling, as excess gelcoat may lead to uneven surfaces.
Allow to Cure
Let the gelcoat cure according to the manufacturer’s recommendations. Cure time can vary based on temperature and humidity, so be patient. It’s essential not to rush this step, as uncured gelcoat can lead to further issues.
Sand and Polish
Once the gelcoat has cured, carefully sand the repaired area using fine grit sandpaper (around 400-600 grit) to blend it with the surrounding surface. Be gentle; you want to achieve a smooth finish without damaging the new gelcoat.
After sanding, clean the area to remove any dust particles. Then, apply a polishing compound with a buffer or polisher, restoring the shine to your boat’s gelcoat. This step will help achieve a seamless transition between the repaired area and the original gelcoat.
Final Checks
Once the polish is complete, inspect your work. Ensure the repair is smooth and visually appealing. Removing the masking tape can reveal clean edges, adding to the professional appearance of your repair. Maintain your boat regularly to prevent further damage, and remember to touch up any small scratches or chips you notice in the future.
Following these steps will help you effectively repair the gelcoat on the bottom of your boat. A well-maintained gelcoat not only keeps your boat looking great but also protects against water damage, ensuring a longer lifespan for your valuable investment.
Essential Tools and Materials for Gelcoat Repair Projects
When it comes to boat maintenance, knowing the essential tools and materials for gelcoat repair projects can save you time and money. Gelcoat provides the necessary protective layer for the fiberglass hull of your boat, enhancing its appearance and preventing water damage. If you’re planning to undertake a gelcoat repair, having the right items on hand will make the process much smoother.
Essential Tools for Gelcoat Repair
Start your gelcoat repair project with a well-equipped toolkit. Here’s a list of essential tools you need:
- Sandpaper: Various grits ranging from 80 to 600 will be necessary. Coarser grits are for rough sanding and removing damaged areas, while finer grits are for smoothing out the surface before applying new gelcoat.
- Sanding Block or Power Sander: A sanding block helps you achieve a flat and even surface. If you have larger areas to repair, a power sander can speed up the process.
- Putty Knife: A rigid putty knife is important for applying and spreading fillers or the gelcoat itself. Look for one with a tapered edge for precision work.
- Masking Tape: Use masking tape to outline the area you’re working on. This helps create clean lines and protects healthy gelcoat from damage.
- Mixing Cups and Stir Sticks: These items are crucial for properly mixing your gelcoat and any of its hardeners or additives.
Important Materials for Gelcoat Repair
Without the right materials, you won’t be able to successfully complete your gelcoat repairs. Here’s what you need:
- Gelcoat: Choose a marine-grade gelcoat that matches your boat’s color. It’s crucial to get an accurate match for a seamless finish.
- Gelcoat Hardener: Most gelcoats require a hardener for application. Ensure that you purchase the appropriate hardener recommended for the specific gelcoat brand you’re using.
- Fiberglass Cloth or Mat: For larger cracks or damage, fiberglass cloth or mat can reinforce the area. This adds strength to the repair and helps extend the life of the gelcoat.
- Marine Fillers: Use marine-grade fillers for repairing larger voids or pits in the gelcoat. These can often be sanded down smooth once cured.
- Waxes and Polish: After repairing and curing your gelcoat, a quality boat wax will restore shine and protect the repair area from UV damage.
Safety Equipment
Safety should never be overlooked during any repair project. Consider adding the following personal protective gear to your toolkit:
- Safety Goggles: Protect your eyes from dust and particles while sanding and applying gelcoat.
- Respirator Mask: Gelcoat fumes can be harmful. A respirator mask will protect you from inhaling noxious chemicals.
- Gloves: Use disposable gloves to protect your skin while applying materials and handling chemicals.
Organizing Your Workspace
Maintaining an organized workspace is essential for efficient gelcoat repair. Lay out your tools and materials clearly, ensuring that everything is within easy reach. Before starting the repair, clear away any clutter that could lead to accidents. It’s also beneficial to work in a well-ventilated area to ensure safety and better drying conditions for your gelcoat.
Consider setting aside enough time to focus on your repair. Rushing through the process can lead to mistakes and a less-than-perfect finish. With these tools and materials at your disposal, you’ll be well on your way to successfully repairing the gelcoat on the bottom of your boat, keeping it looking its best for years to come.
Conclusion
Repairing gelcoat on the bottom of your boat not only enhances its appearance but also extends its lifespan. By employing effective methods such as sanding, applying gelcoat, and finishing with a polish, you can restore that sleek look and durability to your vessel. Taking the time to learn these techniques will save you money and improve your boating experience. It’s worthwhile to remember that regular maintenance can prevent more significant issues down the line.
Equipping yourself with essential tools and materials plays a vital role in ensuring a successful repair. Resources such as gelcoat repair kits, sandpaper, and a proper respirator can significantly ease your project. It is important to select high-quality materials to achieve long-lasting results and protect your boat from the harsh marine environment.
As you embark on your gelcoat repair journey, remember to take your time and follow each step carefully. Expect to make a few mistakes along the way—after all, practice makes perfect. The satisfaction of completing the repair yourself can foster a deeper relationship with your boat and boost your confidence in handling similar projects in the future.
Don’t shy away from seeking guidance when needed, and consider sharing your experiences with fellow boaters. A strong community can offer insightful advice and encouragement. Your boat is more than just a recreational vehicle; it’s an investment. With the right techniques and tools, you can ensure it remains a source of joy for years to come.